


Your Guide to the Best Tools for Sewing
The best tools to start sewing with are actually pretty simple: a dedicated pair of high-quality fabric shears, a trusty seam ripper, a flexible measuring tape, and a good set of pins or clips. These are the absolute non-negotiables. They’re the foundation that will see you through almost any project, making sure you can cut cleanly, measure accurately, and fix mistakes without a meltdown.
Starting with quality basics is the single best piece of advice I can give. It’s what separates a fun, creative hobby from a frustrating one.
Building Your First Sewing Toolkit
Walking into a fabric store for the first time can be overwhelming. There's an entire wall of gadgets and gizmos, and it's tempting to think you need them all. The truth is, you don't. A few well-chosen, high-quality tools will serve you infinitely better than a drawer overflowing with cheap stuff you'll never use.
Think of it as building a "capsule wardrobe" for your sewing space. Start with the classics that do the heavy lifting.
Your most critical investment? A fantastic pair of dedicated fabric shears. I can't stress this enough—these are not the same scissors you use for opening mail or cutting paper. Fabric shears have incredibly sharp, precisely-aligned blades designed to slice through fabric like butter, preventing snags and frayed edges.
Rule number one of sewing club: never, ever use your fabric shears on anything but fabric. It will dull them in a heartbeat. Keep them sacred!
The Unsung Heroes of Your Kit
Beyond your shears, a few smaller tools will quickly become your best friends. These are the items you'll be reaching for over and over again, the ones that often save the day.
- A Good Seam Ripper: Let’s be real, you’re going to make mistakes. We all do! A sharp seam ripper is your get-out-of-jail-free card. It lets you pop out wonky stitches quickly and neatly without tearing a hole in your precious fabric.
- A Flexible Measuring Tape: You'll need this for everything from taking body measurements to measuring curved pattern pieces. I highly recommend getting one made from fiberglass, as it won’t stretch out or warp over time like the cheaper plastic or cloth ones can.
- Pins or Clips: Glass-head pins are my go-to because the glass won't melt if you accidentally hit it with a hot iron. For holding bulky layers or delicate fabrics, sewing clips are a game-changer. A magnetic pin cushion is also a fantastic little luxury—it makes cleaning up stray pins a breeze.
Investing in these foundational tools from the start establishes good habits and ensures your projects have a professional finish. It’s the difference between a frustrating hobby and a fulfilling craft.
Finally, you'll need something to mark your fabric. A simple chalk wheel or a water-soluble pen is perfect for transferring pattern markings. This small step is crucial for making sure all your pieces line up perfectly later on.
Getting this small but mighty toolkit together is all you need to dive into your first few projects with total confidence.
Here's a quick look at the absolute essentials to get you started on the right foot.
Essential Sewing Tools for Beginners
| Tool | Primary Function | Why It's a Must-Have |
|---|---|---|
| Fabric Shears | Cutting fabric cleanly and precisely. | Prevents snagging and fraying, ensuring accurate pattern pieces. |
| Seam Ripper | Removing unwanted stitches. | Allows you to easily correct mistakes without damaging your fabric. |
| Measuring Tape | Taking body and fabric measurements. | Essential for proper fit and accurate project dimensions. |
| Pins or Clips | Holding fabric pieces together before sewing. | Keeps fabric from shifting, ensuring straight seams and alignment. |
| Marking Tool | Transferring pattern markings to fabric. | Crucial for aligning darts, notches, and seams for a professional finish. |
These five tools are the true workhorses of any sewing room. Master these, and you'll be well on your way.
How to Choose the Right Sewing Machine
Your sewing machine is the heart of your sewing room. Picking the right one can feel like a huge decision, especially with all the options out there, but it really boils down to what you want to create. This choice sets the foundation for your success, so let’s get it right.
The first step is understanding the three main players on the field: mechanical, electronic, and computerized machines. Each one is built for a different kind of sewing and a different kind of sewist.
Before you even look at models, ask yourself what you’ll be making. Are you planning on simple hemming and repairs, or are you dreaming of intricate quilts and custom-fit dresses? Your answer is the key to finding your perfect match.
Mechanical vs. Electronic vs. Computerized
Mechanical machines are the trusty workhorses of the sewing world. You control everything with knobs and dials, which makes them incredibly straightforward to use and a breeze to maintain. If you just want a reliable, no-frills machine for basic mending or simple projects, a mechanical model is a fantastic place to start.
Electronic machines are a solid step up. They introduce helpful digital features like an LCD screen for stitch selection, easy push-button controls, and a needle up/down function that stops the needle in the fabric—a game-changer for pivoting at corners. These machines offer a great sweet spot between modern convenience and ease of use.
My two cents: Be honest about the features you'll actually use. An automatic needle threader is a non-negotiable lifesaver for just about everyone. But a machine with 200 decorative stitches is probably overkill if you mainly sew straight seams.
Computerized machines are the top-tier option, packed with hundreds of stitches, embroidery functions, and automated controls for things like thread tension. These powerhouses are perfect for serious quilters, aspiring embroiderers, or anyone who dives deep into the hobby. They make complex tasks feel effortless, but they do come with a higher price tag and a bit of a learning curve.
This simple guide can help you figure out which machine type fits your project goals.
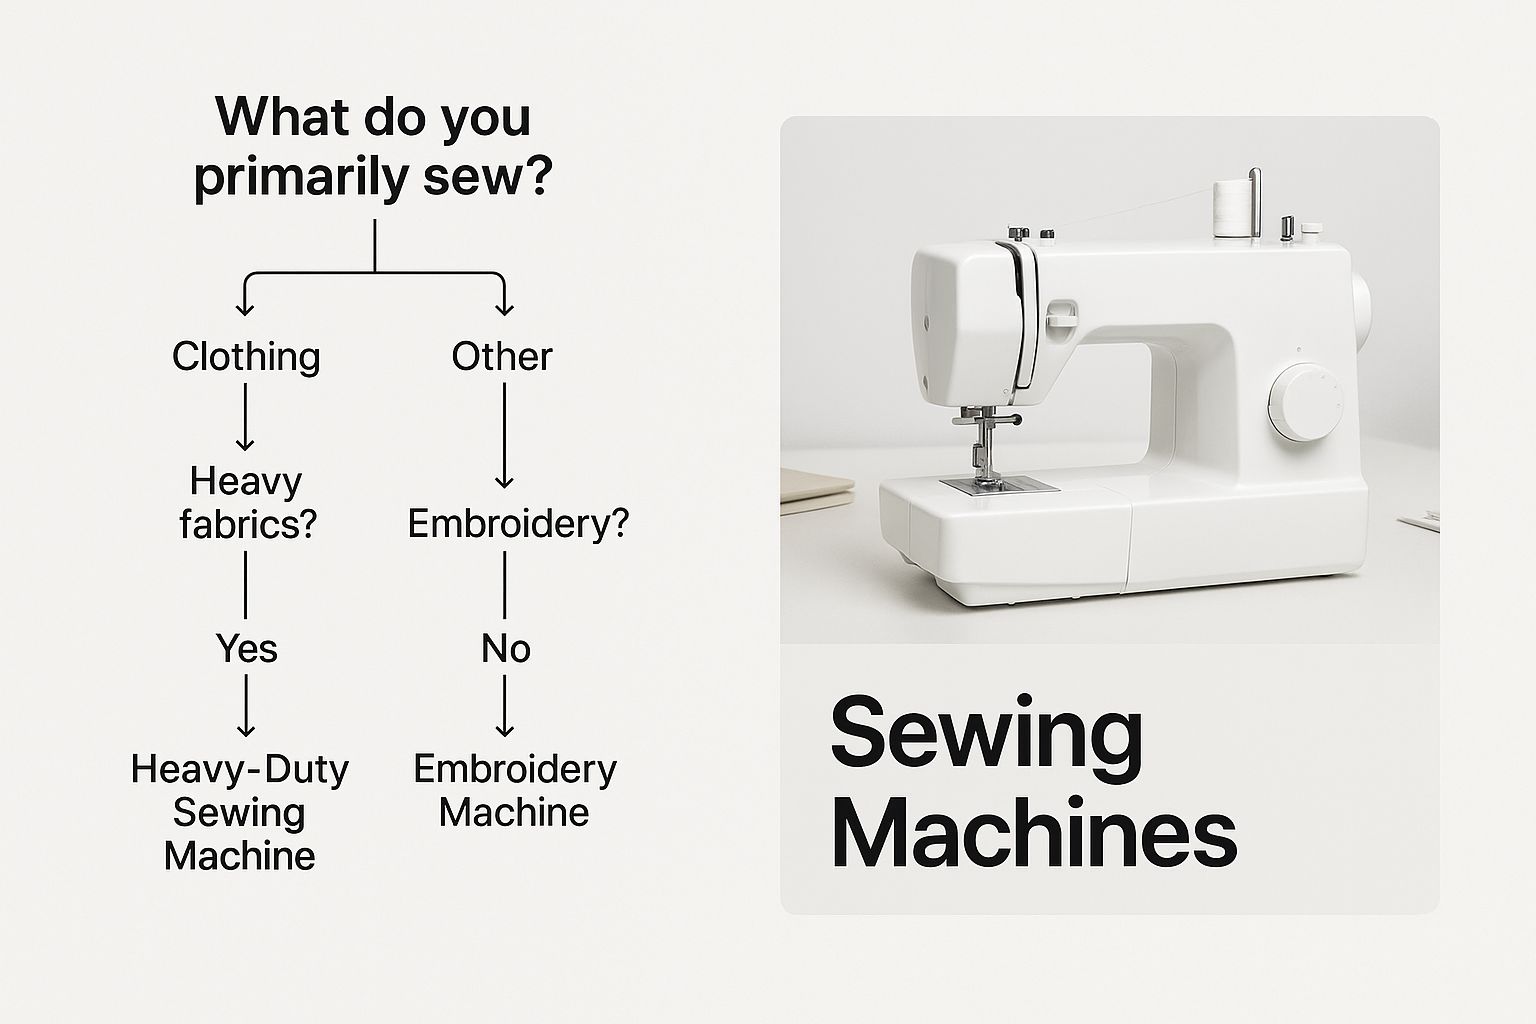
Sometimes a visual is all you need to connect your ambitions with the right category of machine.
Features That Genuinely Make a Difference
No matter which type you land on, a few key features will make your sewing life so much easier. I always recommend looking for these when you're shopping around.
- Automatic Needle Threader: Trust me on this one. This tiny hook saves a ton of time and spares you from squinting and frustration.
- Adjustable Speed Control: A little slider that lets you slow the machine to a crawl is invaluable when you're a beginner or navigating tricky curves.
- Top-Loading (Drop-in) Bobbin: These are far easier to pop in and out than the old-school front-loading style. Plus, the clear cover means you can see exactly how much thread you have left.
The push for these user-friendly features reflects a bigger trend. The global sewing machine market, valued at around USD 4.56 billion, is seeing steady growth as technology makes sewing more approachable for everyone. Industry projections suggest it could hit nearly USD 5.53 billion by 2030, largely thanks to innovations in electronic and computerized models. You can dig into more of these stats and find more insights on the sewing machine market's growth on GrandViewResearch.com.
At the end of the day, the best machine for you is one that fits your needs now but gives you a little room to grow. If you have the chance, go to a local shop and test-drive a few models. The right one will just feel good in your hands and get you excited to start creating.
Achieving Precision With Cutting and Measuring Tools
The real secret to a professional-looking project isn’t some fancy stitch; it’s buried in the prep work. Garments and quilts come together flawlessly when every single piece is cut with absolute accuracy. While a simple measuring tape is a start, a few specialized tools are what truly guarantee precision long before your fabric ever sees a needle.
If you’ve ever tried—and failed—to cut a long, perfectly straight line with scissors, you need to meet the dynamic duo of a rotary cutter and a self-healing mat. For quilters, this combination is non-negotiable, but it’s a game-changer for garment sewers, too. The cutter, which looks like a pizza wheel for fabric, glides along a ruler’s edge to create flawlessly straight cuts with incredible speed.
The self-healing mat is its essential partner, protecting your table and the blade. This pair not only delivers accuracy but also dramatically reduces hand fatigue, which is a lifesaver when you're cutting out dozens of quilt squares or a complex dress pattern.
Beyond the Straight and Narrow
Of course, sewing isn't all straight lines. Getting those beautifully shaped curves just right for necklines, armholes, and hip lines can be a real challenge. This is where a couple of specialized rulers become some of the most valuable tools in your sewing kit.
- A Clear Quilting Ruler: Don't let the name fool you; these are fantastic for everything. The transparent acrylic, marked with a grid, makes it incredibly easy to measure seam allowances, check grainlines, and cut perfect squares. A 6" x 24" ruler is an exceptionally versatile size to start with.
- A French Curve: This oddly shaped ruler is the key to getting smooth, professional-looking curves. It helps you accurately draw or alter patterns for sleeve caps and necklines, ensuring a much better fit than you could ever get by trying to free-hand it.
These tools take all the guesswork out of cutting and pattern adjustments, ensuring your pieces are identical every single time.
Sewing with accurately cut pieces is like cooking with perfectly prepped ingredients—it makes the entire process smoother and the final result far more polished. Don't underestimate the power of good prep work.
Making Your Mark a Temporary One
Transferring pattern markings for darts, pleats, and buttonholes is another crucial step, but using the wrong tool can permanently ruin your fabric. You've got to match your marking tool to your fabric type and how long you need the marks to stick around.
For dark fabrics, a chalk wheel or traditional tailor’s chalk is a classic choice because it brushes off so easily. On lighter materials, a water-soluble or air-erasable marking pen is a brilliant solution. The blue water-soluble marks vanish with just a spritz of water, while the purple air-erasable marks disappear on their own within a day or two.
Just remember to always, always test your marking tool on a scrap piece of your project fabric first. This simple five-second test can save you from the heartache of a permanent stray mark on your otherwise perfect creation.
Why Quality Pressing Tools Matter
If there's one secret that separates a "homemade" project from a "handmade" one, it's this: pressing. Many new sewists see it as an afterthought, something you do right at the end. But the real magic happens when you press your fabric at every single stage of the process.
This isn't about just ironing out wrinkles. Ironing is when you slide a hot iron back and forth across fabric. Pressing, however, is a much more deliberate action. You lift and place the iron, using heat and steam to meld stitches and shape the garment. It's a small difference in technique that makes a world of difference in your final product.
Your Essential Pressing Partners
You can't get far without a good iron, of course. A quality steam iron is your most important tool here, giving you the heat and moisture needed to really mold fabric fibers into place. I always recommend looking for one with a wide range of temperature settings and a really powerful steam burst function.
But an iron alone can only do so much. To really tackle different shapes and fabrics, you'll want a few friends on your team:
- Tailor’s Ham: This is a firm, ham-shaped cushion that's an absolute game-changer for anything curved. Think about pressing darts, shaping a collar, or setting a sleeve cap. The ham mimics the curves of a body, so you can press the fabric into the exact shape it needs to be.
- Seam Roll: Picture a tightly packed, sausage-shaped cushion. This little tool is brilliant for pressing seams open without leaving ugly imprints on the right side of your fabric. It’s perfect for getting into tight spots like sleeves or pant legs.
- Pressing Cloth: Don't skip this one! It's just a simple piece of fabric (undyed cotton or silk organza works great) that you place between your iron and your project. It’s your best defense against scorching delicate materials like silk or leaving shiny spots on wool.
A well-pressed seam is the foundation of a professional-looking garment. It’s a non-negotiable step that takes a project from good to great.
Techniques for a Flawless Finish
The "how" of pressing is just as critical as the "what." The golden rule I live by is to press each seam as you sew it. Don't wait.
First, I always press the seam flat, just as it was sewn. This is called "setting the stitches," and it helps meld the thread into the fabric fibers for a stronger, flatter seam. It sounds small, but it makes a huge impact.
Only after setting the stitches do I press the seam allowances open or to one side, following the pattern's instructions. This is where that seam roll comes in handy. This step-by-step approach ensures your final garment hangs beautifully, with sharp points, smooth curves, and seams that look like they've simply vanished. Honestly, learning to press correctly is one of the most powerful sewing tools you can master.
Leveling Up With Advanced Sewing Equipment
Once you've got the fundamentals down, a whole new world of specialized equipment is waiting to take your projects from good to truly exceptional. This is the point where you stop just making things and start crafting them with tools that deliver professional results. Think of this as your next-level toolkit for sewing with real finesse, precision, and efficiency.
One of the first upgrades many sewists make is collecting a few specialty presser feet. Your machine probably came with a standard, all-purpose foot, which is a workhorse for basic wovens. But if you’ve ever tried to sew slippery silk, delicate chiffon, or even a stretchy knit, you know it can feel like wrestling a greased pig.
This is exactly where a walking foot becomes your best friend. It has its own set of feed dogs that grip the top layer of fabric, moving it along at the same pace as the machine's feed dogs are moving the bottom layer. That simple mechanical teamwork is the secret to preventing shifting, which means you get perfectly matched plaids and smooth, ripple-free seams on even the trickiest materials.
Taming Seams and Edges With a Serger
Ever peek inside a store-bought t-shirt and wonder how they get those clean, stretchy, and indestructible seams? The answer is a serger. A serger (sometimes called an overlocker) is a special kind of machine that trims the seam allowance and wraps the raw edge in thread, all in one lightning-fast step.
While a serger doesn't replace your regular sewing machine, it’s an incredible partner for a few key reasons:
- Durability: The looped stitches a serger creates are naturally stretchy, making it the go-to for knit fabrics. Your seams are far less likely to pop when stretched.
- Speed: A serger sews much, much faster than a standard machine. When you're putting together a whole garment, that time saving really adds up.
- A Professional Finish: It completely stops fabric from fraying, giving the inside of your projects that polished, high-end look.
A serger is an investment, no doubt. But it's arguably the one piece of equipment that will most dramatically improve the quality and durability of your clothes. It’s a real game-changer.
Beyond the big machines, a few small, specialized feet for your regular machine offer a massive return. An invisible zipper foot has tiny grooves that hold the zipper coils open, letting you stitch right up against the teeth for a finish that’s genuinely invisible. In the same way, a one-step buttonhole foot takes all the guesswork out of making buttonholes, creating perfectly identical ones every single time.
The Rise of Automation in Sewing
The push for better, more consistent results is also changing the machines themselves. Computerized functions and automation are becoming more common in home sewing, helping to simplify what were once very difficult techniques. In fact, the global sewing machine market is expected to grow from USD 4.65 billion to USD 6.20 billion by 2030.
The fastest-growing part of that market? Fully automated sewing machines. This shows a clear desire for equipment that makes complex sewing more accessible to everyone. You can dig into the numbers and learn more about the sewing machines market growth on MordorIntelligence.com.
Adding these kinds of advanced tools to your sewing space doesn't just expand what you can create—it makes the entire process more enjoyable and rewarding.
Common Questions About Sewing Tools
It's only natural to have a bunch of questions when you're diving into the world of sewing tools. Whether you're trying to figure out a tricky project or wondering what to buy next, getting good answers is crucial. I’ve heard these same queries from sewers at every skill level, so let's clear up some of the most common ones.
This isn't just about a list of tools; it's about understanding why certain choices can make or break your project. A little bit of knowledge here goes a long way in saving you time and a whole lot of frustration.
What Are the Absolute Must-Haves for a Beginner?
If you're just starting, it's so easy to feel overwhelmed by all the gadgets out there. My advice? Keep it simple. You can tackle a surprisingly wide range of projects with just a small, powerful core kit.
Here are the five essentials I believe every beginner should start with:
- High-quality fabric shears: And I mean only for fabric. Hide them from the rest of the household if you have to!
- A sharp seam ripper: Because mistakes are part of the learning process. Everyone needs one.
- A flexible measuring tape: Accuracy is your best friend in sewing.
- Pins or clips: You'll need something to hold your pattern pieces together securely.
- A small assortment of hand-sewing needles: Perfect for finishing touches and quick mends.
With just these items, you can get a real feel for the fundamentals—cutting, measuring, and assembling—even before you touch a sewing machine.
Do I Really Need a Rotary Cutter and Mat?
Look, they aren't an absolute necessity on day one. But a rotary cutter and a self-healing mat are a serious upgrade, especially if you're after speed and precision. For quilters, they're non-negotiable, but they're also a massive help for cutting those long, straight pattern pieces for clothing.
If you’ve ever been frustrated by wobbly lines or fabric that slides around when you use scissors, this system will feel like a revelation. The difference in accuracy is something you'll notice right away.
How Do I Choose the Right Thread for My Project?
A great rule of thumb is to match your thread fiber to your fabric fiber—think cotton thread for cotton fabric. This way, they'll behave similarly when you wash and wear them. That said, an all-purpose polyester thread is a true workhorse and will get the job done beautifully on most common projects.
As for color, always aim for a thread that’s one shade darker than your fabric. It blends into the seam much more seamlessly than a lighter color. The global market for thread is projected to hit USD 4.84 billion by 2034, which really shows you just how vital this single component is to making things that last.
Remember, the right needle is just as important as the right thread. A dull or damaged needle is the hidden culprit behind so many common sewing frustrations, from skipped stitches to ugly fabric pulls.
How Often Should I Change My Sewing Machine Needle?
Far more often than you probably think! I tell my students to plan on a fresh needle after every 8-10 hours of sewing time. A good habit is to just pop a new one in before you start any significant project.
Also, make sure you're using the correct type of needle for your fabric, whether that's a universal, jersey, or denim needle. It’s such a simple thing, but it's one of the best ways to prevent skipped stitches and protect your fabric from damage. It just makes the whole experience smoother.
At Famcut.com, we're truly passionate about giving the cosplay and sewing community the tools and knowledge needed to bring creative visions to life. Feel free to explore our hand-picked selection of high-quality sewing essentials and find what you need for your next creation.